
Research Helps Bins Resist Weather
New UNL Research Aims to Strengthen Grain Bins Against Natural Disasters Such as Derechos
OMAHA (DTN) -- If anyone has lived in the Midwest for long, you know the region sees high winds. Many days have seen high winds whip through the region's farms, many of which have grain bins. This makes grain storage structures vulnerable to severe weather.
To combat that vulnerability, a researcher from the University of Nebraska-Lincoln (UNL) is studying the structural engineering of grain bins against dangerous weather.
NEW GRAIN BIN RESEARCH
Christine Wittich, assistant professor of civil and environmental engineering at UNL, began her career in California where she became interested in earthquake damage to statues. After she moved to Nebraska in 2017, she noticed agricultural structures such as grain bins and center pivot irrigation units were often vulnerable to weather challenges.
"I was pretty quickly introduced to wind storms ... I got interested in rural damage. These structures seemed fairly vulnerable," she stated in an UN-L press release.
Wittich was recently awarded a five-year, $615,387 Faculty Early Career Development Program (CAREER) award grant from the National Science Foundation to research grain bins. The award supports pre-tenured faculty who exemplify the role of teacher-scholars through outstanding research, excellent education and the integration of education and research.
Wittich aims to improve the resilience of rural infrastructure and communities in the face of natural disasters. The CAREER award includes an educational component to encourage rural students to see opportunities in engineering as a possible career.
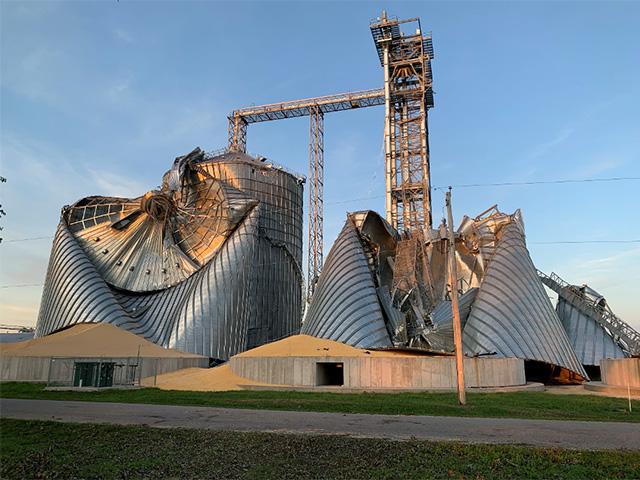
The project stems from Wittich's earlier research in the wake of a derecho that struck several states -- South Dakota, Nebraska, Iowa, Illinois, Wisconsin, Indiana, Michigan and Ohio -- on Aug. 10, 2020. A derecho is a widespread straight-line windstorm associated with fast-moving thunderstorms. The 14-hour 770-mile storm in 2020 caused an estimated $11 billion in damages in total, making it the most damaging thunderstorm in American history.
Iowa's grain bins were especially hit hard. In October, 2020, DTN reported that the Iowa Department of Agriculture and Land Stewardship estimated 120 million bushels of grain storage were damaged or destroyed on- and off-farm in the state from that August derecho. Iowa's grain storage capacity was 2.1 billion bushels on-farm and 1.52 bb off-farm before the derecho hit, according to USDA.
P[L1] D[0x0] M[300x250] OOP[F] ADUNIT[] T[]
There are an estimated 750,000 grain bins across the U.S. and they are designed to withstand internal pressures but not high winds. These bins are a key component of rural infrastructure in the nation's ag economy and the food security of people across the nation and the world, Wittich said.
WATCH THOSE WINDS
Wittich told DTN her research project will focus broadly on natural hazards, but wind is a major consideration. The work will be both experimental and computational.
Experimental tests will be conducted at the Wall of Wind facility at the Florida International University, she said. Winds up to 150 miles per hour can be created and imparted to near full-scale structures. (A Category 5 hurricane is 157 mph or higher.)
"I'll be testing a few different bin configurations as part of that experimental campaign," Wittich said. "The bins will be tested at both low and higher wind speeds up to failure."
Results will be captured from attached sensors to understand the wind pressure and the structural response as the bin approaches failure, she said. Data will also be recorded with high-resolution, frame-rate video to best visualize the mechanisms. Wittich said this will help update computational models to simulate how different grain bins will perform under various wind scenarios.
CHANGES TO GRAIN BINS?
Wittich's research results could lead to different construction standards for grain bin construction.
"One of the most significant predictors of enhanced performance were vertical stiffeners along the bin walls," she said. "This will be something further explored in the experimental and computational tests."
Wittich has met with several grain bin manufacturers regarding her research.
They seem interested in this type of work and are open to the enhancing performance of their structures, she said. However, the project will be conducted independently and without corporate sponsorship through the National Science Foundation.
Wittich also wants to promote awareness in rural communities through educational models and a citizen-science initiative for post-disaster reports. Since researchers can't go to every storm-affected area, her project will include an app that farmers or other community members can access to look at past storm damage data and enter new information.
This information can help drive further research, she said.
Future research will include other types of agricultural infrastructure and other natural disasters. For example, a recent hurricane devastated poultry housing in Florida, Wittich said. Hurricane Idalia made landfall Aug. 30, 2023 as a Category 3 storm.
For perspective on the change in damaging winds in the Corn Belt, see DTN Ag Meteorologist Emeritus Bryce Anderson's blog here: https://www.dtnpf.com/…
To see more on DTN's special coverage of the derecho from 2020, see https://spotlights.dtnpf.com/…
Russ Quinn can be reached at russ.quinn@dtn.com
Follow him on social platform X @RussQuinnDTN
(c) Copyright 2024 DTN, LLC. All rights reserved.